28 June, 2014

Cashew Tastings

Our cashew trees had a terrific yield this year, the best we have ever seen.  Cashew nuts have a very unusual structure - the nut hangs below the yellow or red cashew fruit.
Cashew nuts dangle beneath yellow cashew fruits, called cashew apples.  You can also see some of the green apples and green nuts on the right side of the photo.
Those little cashew flowers, which are never large or showy, make big fruits and nuts.  Many hummingbirds love the cashew flowers and the flowers smell delightful.
Almost every day for a month or so this many fruits and nuts fell to the ground for easy harvest.
Joy harvested lots of nuts and let them air dry before toasting them.  Here, she is wrapped for protection against sparking embers and smoke while stirring a big pot containing the nuts still inside the shells.
The fire is made in a circle of conch shells with dried sticks shoved underneath to feed the fire.
The smoke is from the oil in the shells.
Joy uses an old pot with holes poked through the bottom.  The nuts are heated in the otherwise empty pot.  Once they have cooked enough, the pot is dragged off the fire and tipped over.
The nuts cool on the ground before sorting out those needing a little more roasting.
Look how oily the nuts are. Once cooled, the shells are cracked open with a hammer and the nuts picked out.
After shelling, the Joy's cashews are ready to eat.
I brought some of the cashews Joy prepared and some other locally prepared cashews to my sister's place in Colorado where I am now.  My other sister and her family and my brother are here for a little family reunion of sorts.  We are doing a taste test of the 3 sources of cashew nuts along with some assorted Belize chocolate from Cotton Tree Chocolates accompanied by some lovely Port wine.  The result of the cashew tasting - 5 out of 7 adults prefer Joy's cashews to those packaged for sale in American grocery stores or the batch purchased from a street vendor in Belize.  The American store cashews were too salty and perhaps a little "pasty" while Joy's were crunchier and tastier than the either the American or the other Belize nuts.

More from Colorado coming up.

14 June, 2014

A Visit to Bullet Tree Falls Village, Cayo District, Belize

 Earlier this month I spent 5 days visiting my friend Martha at her new home in Bullet Tree Falls Village in the Cayo District of Belize near the town of San Ignacio.  I went there ostensibly to help her do some decorating, but we also took some time out for fun.  And had fun with the decorating, too.  Martha's new home is on the banks of the incredibly lovely Mopan River.  She has 2 large lots that slope gently down to the river.
Looking toward the house from about halfway to the river.  Martha has planted all sorts of trees, shrubs, and flowers; by this time next year is will look very different because plants grow so quickly in this climate.
There are some nice mature plants, like this palm tree, on her property already.
Ezabella and Kat are good buds and spend lots of time playing together.
The sheep family is on the lot next to the house.
Twin lambs.
One of the fun things we did was have visit from Gary and his lovely green-winged macaw, Dino. Dino is so famous, he has his own webpage.  Definitely worth a visit.

Dino perched in a tree next to the Mopan River.
The very photogenic Dino stayed in the tree, letting me take photo after photo.  
Peering coyly at the camera through the leaves.
Eating the fruit of the palm seen in one of the photos above.
Flying to Gary.  Look at his gorgeous plumage. Dino's, not Gary's. (Sorry Gary! I'm sure yours is gorgeous, too.)
Snacking on his favorite - orange tree wood.
Just to show that we didn't goof off the whole time, the last shot is one of Martha trying out the paint colors she chose for her new kitchen hutch.  A nice turquoise on the back wall, white inside the shelves, and a silver grey on the frame, drawers, and cabinet doors.  I think the colors look great against the newly painted yellow walls of the kitchen. We also hemmed and hung endless curtain panels.  
The silver grey takes the edge off the what would be an overwhelming amount of white.  
We made a good start on the decorating, didn't we, Martha?  Maybe I should visit again and help you finish.  Then we could go swimming again at Mahogany Hall, and have another wonderful dinner at the San Ignacio Hotel, and get more of the yummy ice cream from the ice cream man who drives through the neighborhood in his pickup truck, and work out new combinations of tequila and lime juice, and see Gary and Dino again.  and I guess we could hem a curtain or two and paint a few walls.  ;-)

10 June, 2014

Construction Continues

Lots of progress on our building project since I last wrote.  Our design is, shall we say, unconventional.  It was not on purpose, but was a failure of communication between us and the Spanish-speaking crew that did the concrete foundation.  We had asked for the addition to be at a 26 degree angle relative to our existing cabana and somehow that 26 degrees was spread out over the entire matrix of the base rather than being executed in one segment.  So we wound up with a sort of fan shape.  Unfortunately, we did not realize this until all the concrete had been poured.  I looked it over and thought I could make some adjustments to the design without too much trouble, so we decided not to tear it down and start over, but rather to adapt to what was in place.  While that wasn't exactly a bad decision, it did have a far greater impact on the construction than I had anticipated...

We wound up with an irregular hexagonal shaped addition having no square corners, no parallel walls, and 6 walls of different lengths.  In addition, the ridgeline for the roof is not perpendicular or parallel to any of the 6 walls.  And the orientation of the ridgeline is critical for correct positioning of the solar panels.

Fortunately,we have an excellent carpentry crew that has risen to all the challenges thus far and I have confidence that they will rise to the upcoming challenges.  The first challenge was to create the 6 corner posts for the stud walls.  We used 10ft long 4x6s that Derwin and Paschal managed to custom rip-cut to precisely fit each corner.
Derwin marking and starting the first cut. Paschal is in the background marking the next post.
Derwin completes the first cut. Notice that this complex cut is done more or less free hand with only a rip fence on the hand held circular saw for guidance.
Derwin completes the second cut which forms the point of the chevron with assistance from Matthew.
Paschal and Derwin consult about the positioning of the cuts for the tail of the chevron.
Derwin completes cuts 3 and 4.
Behold the chevron!
For each corner post, Paschal patiently transcribed the angles from the 4x4 sill plate that had been fastened to the concrete beams.

Next, the crew positioned each corner post.
Paschal and Orington (AKA Tiger) secure the post in a plumb position.
Richard attaches another brace to hold the post plumb.
The next post ...
Richard screws down the plate securing the post to the 4x4 sill plate.  Notice the precision with which the post is shaped and positioned to match the odd angle of the corner.  Also notice the lack of footwear - a reminder that Belize is still a 3rd world country. Even here, though, we were able to find people like Richard, Paschal, and Derwin who are perfectionists and with real professional skills.

Getting the corner posts up and plum was a significant milestone for us.  As was using the laser level (an eBay purchase by Dennis that we brought down here with us) to get the tops of the posts all at the same height.  Even if we have no square corners or parallel walls, we can do plumb and level!
A corner post positioned over concrete support column and beams.

The post is right over the concrete column.
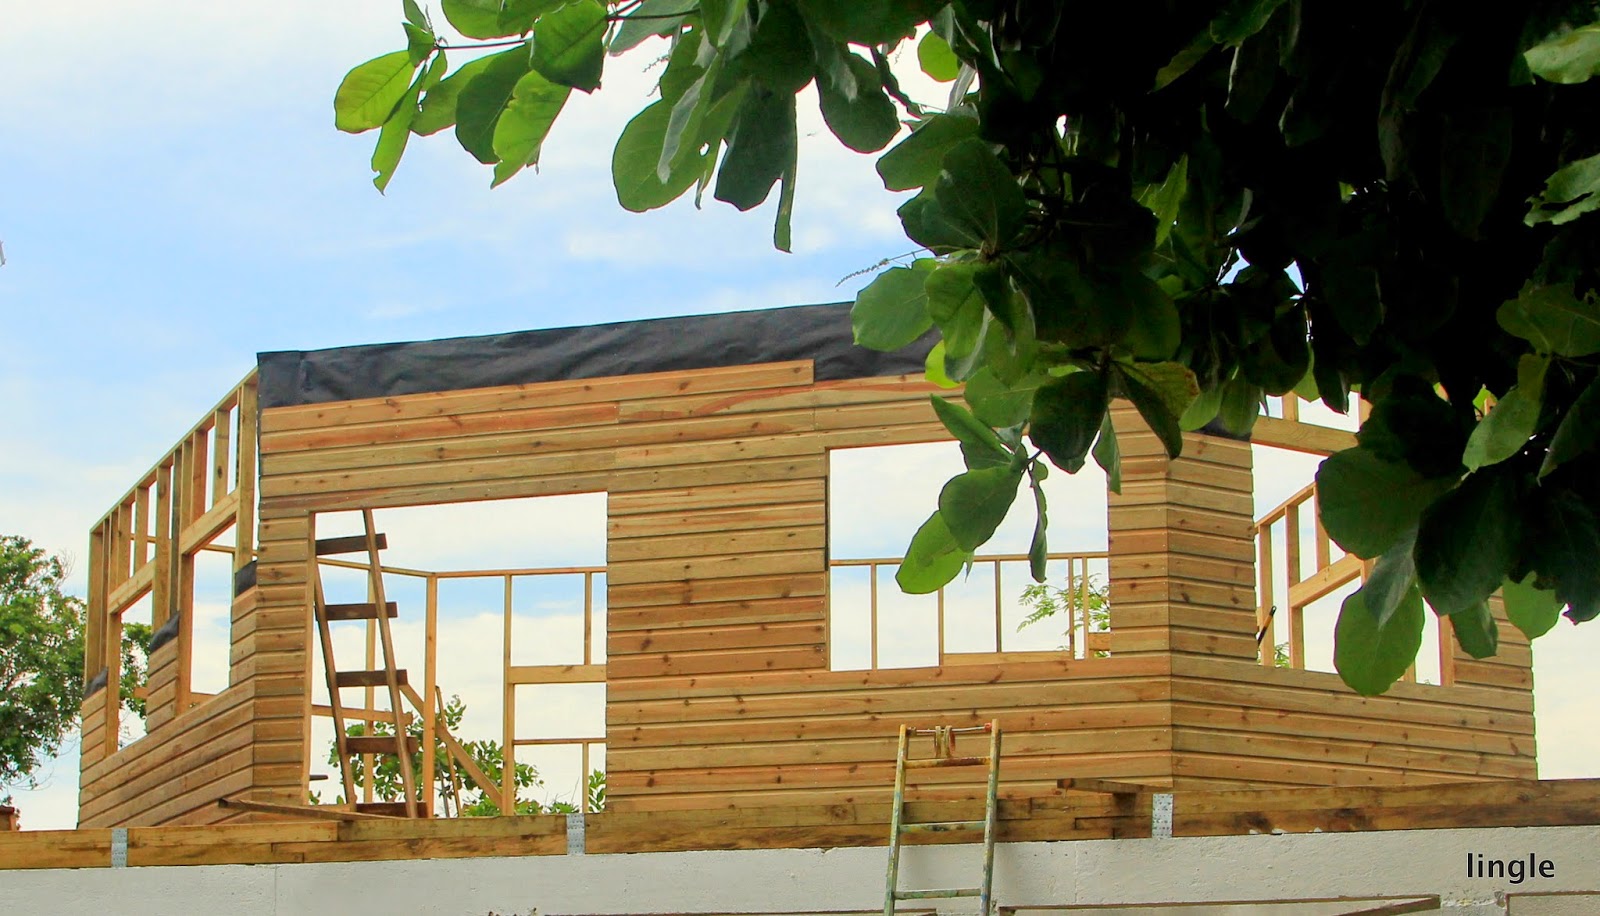
At this point, I went to visit a friend for 5 days and I came back to see the stud walls with headers in place for windows and doors all in place and siding up on most of the walls.  Tar paper (roofing felt) is used extensively in Belize, and we are using it too.
Looking to the north.
The west wall with the high bathroom window to the left and the back door and an office window to the right.
Most of the siding is up on the front of the addition.
The view from the dock.  The roof will be fairly high to accommodate a loft with doors to the front and back.

So that it how things stand now.  Next up is window delivery and construction of a wooden supporting beam, columns, and roofing trusses from Santa Maria tropical hardwood.